A. Add/Edit Products
General
The General tab contains key information for displaying a product on SmartWorld (SW).

Information
- Name - The name of the product displayed in the storefront.
- Categories - The categories which the product displays under.
- Price - The price the product is presented as to the customer, excluding shipping and tax.
- Full description - Information displayed on the product's page underneath the product's image, values, and basic details. If you do not set a short description further down in this tab, this description will also be used in the product's basic details for the short description. This description is also displayed on search engines.
- Status - Determine whether or not to display the product to the public (active), hide the product to all except those with a direct link (hidden), or have the product be unavailable through (SW) (disabled).
- Images - This image is the primary image of the product to be displayed by default around SW. If you are having trouble uploading images, please refer to this guide's "Uploading/Optimizing Images".
Options Settings
These two settings are important for products that have options (i.e. a shirt that comes in blue, red, small, large, etc). You can find more information on the Options tab further below.
- Options Type -Simultaneous allows customers to select options for a product in any order, while Sequential forces customers to select options in the order they appear.
- Exceptions Type - Forbidden option combinations will not be available to the customer (e.g. a blue shirt does not come in small), while Allowed option combinations will be the ONLY options available to a customer (e.g. a shirt only comes in large blue and small red).

Pricing / Inventory
- CODE - Stock Keeping Unit (SKU) used for your records.
- List Price - The manufacturer suggested retail price. If this price is higher than the Price listed under Information, the product will be listed as on sale.
- In Stock - If Inventory is set to "Track without options", this number is used to determine the inventory of this product on SW.
- Zero Price Action - Do not allow customers to add the product to cart prevents any customer from purchasing a product whose price is set to $0. Allow customers to add the product to cart lets customers add products with a price of $0 to the cart. Ask customer to enter the price prompts the customer to enter the price they are willing to pay.
- Inventory - Track without options is the default setting that uses the In Stock number to track the number of this product left available to purchase on SW. Track with options uses Option Combinations to keep track of stock for different options (e.g. there are 2 blue shirts and 3 red shirts). A product option must exist before Track with options will display. Whenever the stock reaches 0, the product or option will be unavailable for purchase. Do not track forgoes typical stock numbers, allowing a potentially unlimited amount of the product to be sold.
- Minimum Order Quantity - The minimum number of products a customer must buy with each order. If this number is set to 0, no minimum number is required for purchase.
- Maximum Order Quantity - The maximum number of products a customer can buy with each order. If this number is set to 0, no maximum number is required for purchase.
- Quantity Step - Customers must buy the product in steps. For example, if this number is set to 5, the product must be bought in steps of 5 (i.e. 5, 10, 15, 20..).
- List Quantity Count - Similar to the quantity step, this number forces the stock of the product to display in steps. For example, if this number is set to 10, the product's stock will always set to tens.
- Taxes - This checkbox determines whether or not to charge your customer taxes if they are within the same state as your store.

Availability
- User Groups - Choose which type of user can purchase the product. For example, if only Registered user is selected, a customer must log in to see the product and purchase it on SW.
- Creation date - This date is automatically set to the day the product was created on SW.
- Available on - This date can be set to make the product available for purchase on a date set in the future. The product will display on SW but will not be able to be added to the cart until the set date.
- Out of Stock Actions - None will prevent the customer from purchasing the product when the in stock is 0. Buy in Advance requires a positive in stock amount AND an available on date set in the future, and will allow the customer to buy a product that they are notified will ship on the available on date. Sign up for notification allows the customer to sign up for an email notification when the product's in stock amount is 0.

Extra
- Product Details View - This changes the appearance of your product's page. We highly recommend you leave this to the default.
- Downloadable - If this is a digital product, check this box to allow content to be downloaded.
- Short Description - This description is used in the product's basic details to give the customer quick information about the product. If you do not have a full description, the short description will be used.
- Popularity - The product's rating based on views, adding to the cart, and purchases.
- Search Words - Enter search terms here that describe your product to help your customers find the product via the search on SW.
- Promo Text - This is a short line of text displayed beneath the product's price, above the short description.
Images
The Images tab allows you to add additional images to complement the main product image.

To add an image, select Local to upload from your device, Server to upload or select an image on our server, or URL to use a linked image. For more information, see the Uploading/Optimizing Images section of this guide.
You can manage multiple uploads at once by using the following buttons:

In order, these icons represent Add New, Clone, and Delete functions. Clicking Add New will add a new image slot. Clone will duplicate the current image into a new slot. Delete will delete the slot.
When you have Saved after uploading some additional images, you will see the following:

You can reorder images by clicking on the gray bar and dragging the image where you want it to be. To delete an image after saving, hover over the image and look for the small X to remove it.

SEO
The SEO tab is key to optimizing information for search engines. By tweaking the SEO for a product, you increase the likelihood of a product showing up on search engines like Google.
SEO
- SEO name - The URL of your product is determined by the primary category (selected in the General tab) and what is inputted here.
Meta Data
- Page Title - The text displayed in the web browser when someone is viewing the product's page.
- Meta Description - A description which summarize's the product. It is recommended to keep this description to around 160 characters. Search engines use this description in search results when a searched word is within the description.
- Meta Keywords - Words that help tell search engines more about the product.
The Google rich snippets preview gives you an idea of what your product may look like on Google.
Options
Have a product that comes in multiple sizes, colors, or so forth? You can create product options to allow customers to specify which product they would like to purchase.
There are two ways to create product options depending on the product type, simple or configurable.
The default product type is Simple. Simple product options are best used if variations use the same SKU code as the base product, as they allow you to add onto the base price of the product.
Configurable products treat variations as individual products, allowing you to set unique prices, SKU codes, images, and more!
When creating a new product, there is an option called Product Type under the General tab. Select which product type you prefer for your options there.

Note: If you have already created a product, but wish to use the Configurable type instead of Simple, you can convert the product to configurable by clicking the gear icon in the top right and selecting "Convert to configurable product". This process is not reversible, but you can accomplish anything a Simple product can do with a Configurable one, albeit with a few extra steps.

Regardless of which product type you are using, the next step is to add an option to the product. To do so, navigate to the Options tab and find the following button:

Click on Add option and you will be greeted with the following window.

General
- The Name of the option will be the descriptor of the product options you are offering. For example, "Color" or "Size".
- The Position determines the order of multiple product options for a product. In other words, if you have "Size" set to 10 and "Color" set to 20, Size will display first and Color will display second on the product's page.
- The Inventory selection is available after initially saving the product option. Check this box to allow this product option to have different stock for each variant. For example: a red shirt can have 3 available, while a blue shirt has 2. Check this box to give unique SKU codes to product variations, as well. Adding the stock and unique SKU codes for a specific variant is part of the Option combination process described further down.
- The Type determines how the customer is able to select the product option. Select box is the standard drop down and select one option. Radio group is a list of bullet pointed options from which the customer can select one. Check box allows the customer to check multiple boxes. Text allows the customer to enter in a short, one line string of text. Text area is a larger box dedicated to allowing the customer to enter a lot of text. File allows the customer to attach a file to their purchase.
- The Description allows you to describe your product option that will be displayed next to the option's name in a ? bubble.
- The Comment is a brief amount of text displayed underneath the product option.
- Required determines whether or not the product option is required for purchasing or not.

Variants
Note: If you are working with a configurable product, the most important part under the Variants tab is the Name. Position and Icon can be changed here if desired. Status and modifiers will be changed for configurable products in the next step.
- The Pos. (Position) once again determines the order of multiple product variations.
- The Name is the name of the product variation that will display on the product's page. This can be "Red" for a Color option or "2 oz." for a Size option.
- The Modifier / Type is a way to adjust the price of the variant in conjunction with the base price. The first box allows you to enter a positive or negative numerical amount to adjust the base price. The second box allows you to decide whether or not the number is to be a fixed dollar amount, or a percentage of the base price.
- The Weight modifier / Type is a way to adjust the weight of the variant for shipping purposes. The first box allows you to enter a positive or negative numerical amount to adjust the base weight. The second box determines if the number is a fixed weight or a percentage.
- The Status determines whether or not the variant is Active (available on the storefront) or Disabled (unavailable on the storefront). This can be used to hide product variants you no longer offer, but may offer again in the future.
- Clicking the Extra text drops down an area where you can upload an icon to display on the product's page with the variant.
- The black + (Plus) allows you to add a new, blank product variant. The black Clone button to the right of the + (Plus) creates a copy of the current product variant. The X will show black when there are multiple product variants, allowing you to delete unnecessary variants.
If you are editing a Configurable product, the next step is to generate the variation combinations. This is accomplished by the Generate product variations button that now appears under the Options tab.
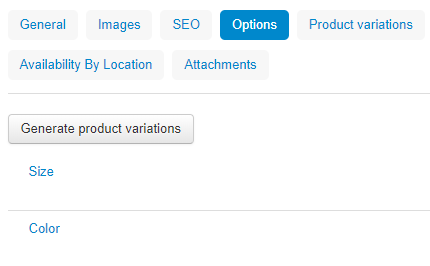
After clicking the button, you will see something similar to the following:
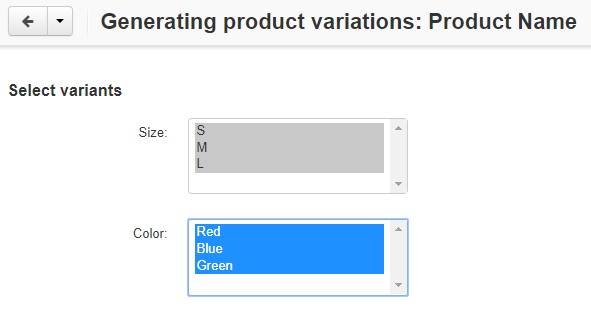
This screen allows you to select what variant combinations you wish to create.
Note: Click and drag or use CTRL+Shift to select multiple variant options in a row. Click while holding CTRL to select multiple variant options individually.
After clicking Next in the top right corner, you will be greeted with the following page:
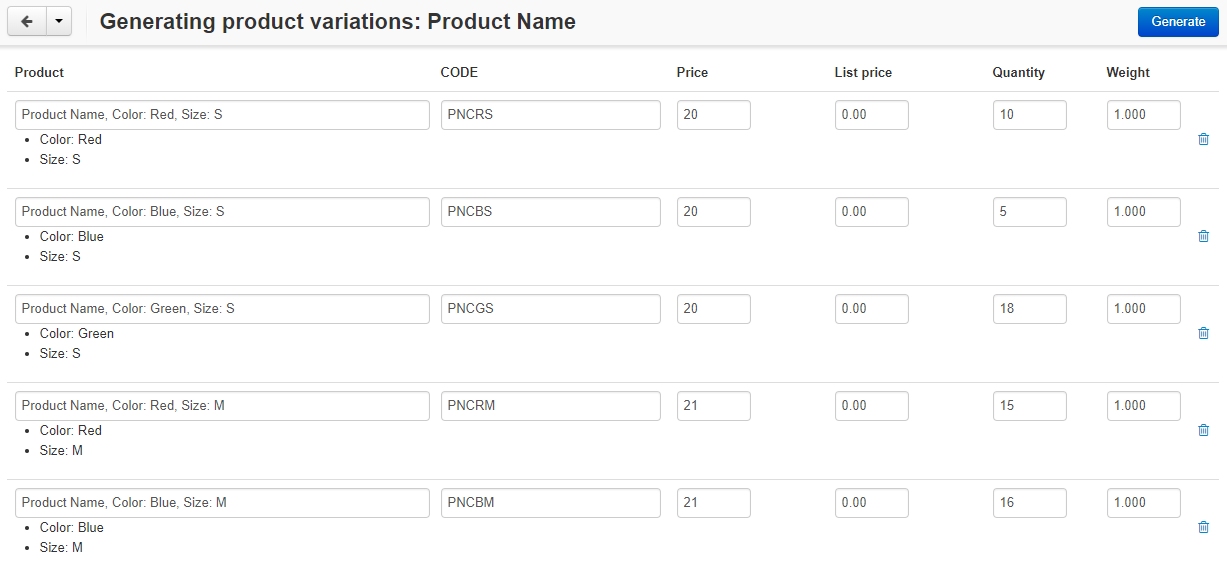
Here, you can give the variant a unique name, SKU code, price, MSRP (list price), inventory amount (quantity), and weight. Once you are done making changes, click the "Generate" button. The page that opens next will allow you to make any last minute modifications, and let you change the status of each individual product variation.
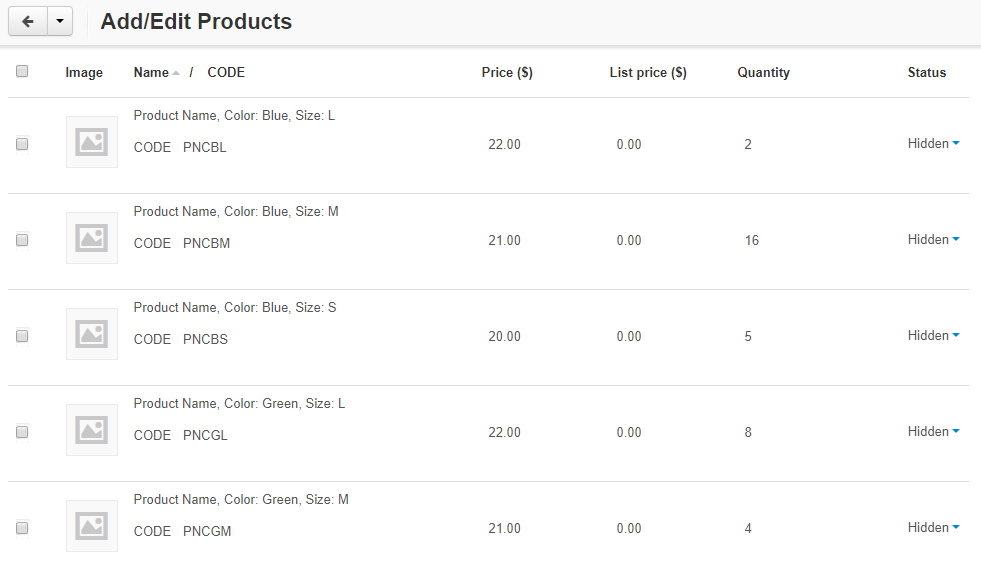
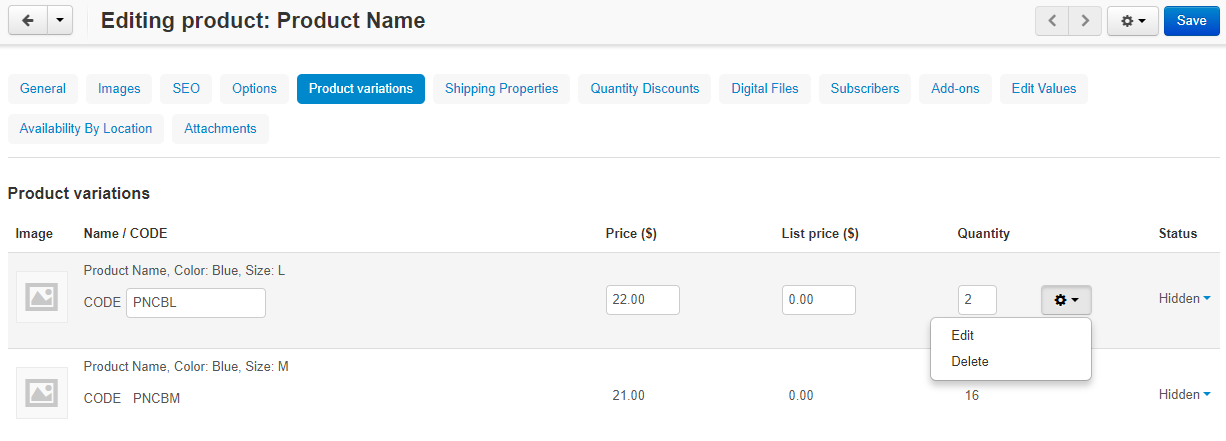
To make changes to product variations later, simply edit the product as you normally would and select the "Product Variations" tab.
If you are editing a Simple product, you may have multiple product options with multiple variants but certain combinations are not what you offer. In this situation, after you have created all of your product options, you may set Forbidden combinations.
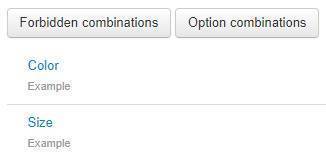
Note: The Exceptions type must be set to Forbidden in the General tab. If the Exceptions type is set to Allowed, this button will change to Allowed combinations. Using Allowed combinations, you restrict the product to allowing ONLY what combinations you set up (e.g. a combination of red and small will be the only shirt available for purchase). Setting up Allowed or Forbidden combinations is the same process, otherwise.
Click Forbidden combinations (or Allowed combinations) to see the following information:

Any combinations you create will be found here. Clicking the ADD button near the top right will open the window below.

Your product options and their respective variations will be listed as potential combinations to forbid. You can choose from the drop down any one of the variants, all of them, or none from a particular option. The black + (Plus) creates a new forbidden combination. The black Clone button next to the + (Plus) creates a copy of the current combination. The X will show black when there are multiple combinations, allowing you to delete them when necessary.
Examples of forbidden combinations and their results are below:
- Amount: Single, Color: Red, Size: Any variant
Result: When the Single amount is selected, Red disappears from the list of Color options. - Amount: Single, Color: Red, Size: No variant can be selected.
Result: When the Single amount is selected, Red can be selected. When both are selected, no Size option can be selected. - Amount: Any variant, Color: No variant can be selected, Size: 5 oz.
Result: When 5 oz. is selected for Size, Color cannot be selected. Any Amount can be selected. - Amount: No variant can be selected, Color: Red, Size: No variant can be selected
Result: When Red is selected for Color, no variants can be selected for Amount AND Size.
Note: Combinations can get overly complex. It is recommended that you test your combinations to ensure the options available are correct.
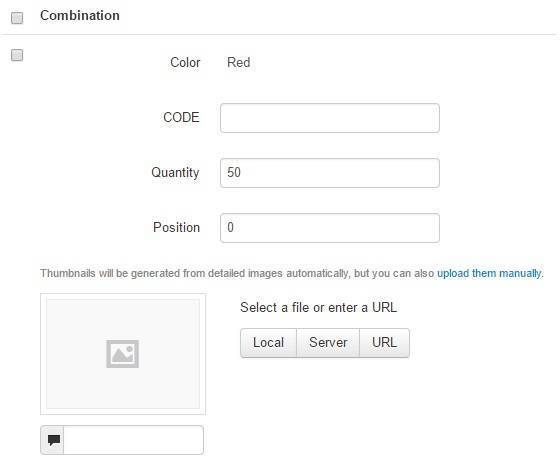
When you select the Inventory checkbox for a product option, you can manually adjust the SKU code, quantity, and icon of combinations in the Option combinations page under the Options tab.
In order to define the stock of a variant, you must go to the General tab of the product editing screen and select the Inventory option Track with options under Pricing / inventory.
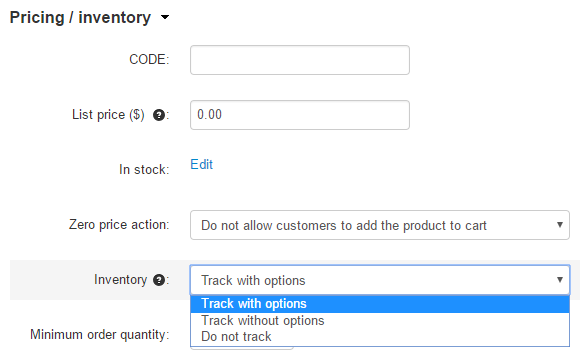
Note: You have to create at least one product option before you can select Track with options. Otherwise, this selection will not appear.
After doing so, return to the Options tab and select Option combinations.

Here, click the ADD button to individually create your own variation combinations or select the gear and Rebuild combinations to generate (or update) every possible combination available.

The following information will display for all product combinations created.
Shipping Properties
This information is vital to SW's automatic shipping calculators. Please ensure this information is as accurate as possible to prevent going under or over on shipping costs.
Note: In order for you to fully appreciate the requirements for packaging your products and the necessity of considering the exact dimensions for your product packaging, please review the USPS Guidelines and FedEx Guidelines.
General
- Weight - The weight of the product in pounds (lbs).
- Items in a Box - Minimum and maximum number of this product to be shipped in a single box. This is required to input dimensions for the boxes.
- Box Length/Width/Height - The dimensions of the box used to ship the product, measured in inches.
- USPS Priority Mail Flat Rate Options - Select an option other than "None" if the product is shipped in one of USPS's Flat Rate box options.
Custom Shipping Choices
- Free Shipping - We highly recommend that you offer Free Shipping on all of your products. It is now expected (thanks to Amazon) and your sales will be significantly higher when you do. Build the cost into your price. It's smart business. Check this box if you wish to offer free shipping for this product while using SW's master account. Note: The shipping cost will be deducted from YOUR store's earnings when offering free shipping.
- Custom Flat Rate Shipping - Check this box and enter an amount into Custom Flat Rate Shipping to charge the customer a flat price for shipping using SW's labels. Note: The cost of the label will be automatically calculated. If the flat rate price the customer pays isn't enough to cover the cost of the label, then the difference will be subtracted from the vendor's earnings.
- Local Pickup Only - If your product cannot be shipped and MUST be picked up locally at your business, select this checkbox.
- In-House Fulfillment - Check this box and enter an amount into Custom Shipping Cost to use your own fulfillment methods instead of SW's master account. Note: A Custom Shipping Cost of 0.00 will display as Free Shipping to the customer.
- Special Packaging and Handling - Enter an amount to add an additional charge that the customer must pay along with the shipping.
Quantity Discounts
In the Quantity Discounts tab, you can offer discounts for bulk purchasing your product.

- Quantity - Minimum number of the product purchased at once to qualify for the discount.
- Value - The amount to discount based on the type (see below).
- Type - Absolute discounts use the value as the new price per product (e.g. If 10+ products are purchased at once, the price will be $12.99 per product instead of $15.99). Percent discounts take the value and original price into account to calculate a new price (e.g. If 10+ products are purchased at once, the price will be 5% of $15.99).
- User Group - This allows you to control which user groups can take advantage of the bulk discount.
Digital Files
If your product is a downloadable digital product, the Digital Files tab is where you upload the files to be downloaded after purchase.

To submit a file, click on the Add File button near the top right to open the following screen:

General
- Name - Name of the file to be downloaded.
- Position - Used to set the order of multiple files for a product.
- Folder - Select the folder which the file should be placed under (see below how to add a new folder).
- File - Upload the file using the Local, Server, or URL methods. Local allows you to upload a file directly from your device. Server allows you to upload and access files previously uploaded on our server. URL allows you to use a link to upload your file.
- Preview - An example of the file to be downloaded upon full purchase, which can be downloaded and viewed by any prospective customer on the product's page.
- Activation Mode - This setting relates to what happens after a customer has purchased your product. Manually activating the file requires that you go in and allow the customer access after the purchase. Immediately activating the file means that the customer can download the file as soon as possible after the purchase. After full payment allows a customer to download the product after the status of the order has been changed to Processed or Completed.
- Max Downloads - The maximum number of times a customer can download a digital product.
- License Agreement - Text displayed with the file that the customer agrees to when downloading a digital product.
- Agreement Required - Determine whether or not the above license agreement MUST be agreed to before a customer can purchase the product.
- Readme - Text used to describe the downloadable product.
Add-Ons
Edit Values
The Features tab is where you can select from a list of icons which best fit your product. These icons are used across the website to help customers filter for specific values.

Simply click on whichever values apply to your product. Selected values will appear green.
Availability by Location
The Availability by Location tab is where you can select which states the product is available for purchase.

Attachments
The Attachments tab is where you can attach files to a product which are available to download at any time by a customer. For example, you can attach an instruction manual for a product here.

Click the Add attachment button to see the following screen:

- Name - The name of the attachment.
- Position - Used to determine the order of multiple attachments.
- File - Upload the attachment using the Local, Server, or URL methods. Local allows you to upload an attachment directly from your device. Server allows you to upload and access file attachments previously uploaded on our server. URL allows you to use a link to upload your attachment.
- User Groups - This setting allows you to determine which type of customers can access the attachment.
Subscription Types

Tick the checkbox next to the period of time you wish to offer the subscription, then enter the price to charge the customer each billing period.


